How to create a WordPress staging site with WP Toolkit in Plesk
Published on November 9, 2026 9 min read
Test updates and redesigns on a copy first. Clone your WordPress site with WP Toolkit in Plesk, keep the copy private and push changes live.

To create a WordPress staging site in Plesk, open WP Toolkit, click Clone on your site's card, choose where the copy goes (a subdomain such as staging.yourdomain.com or a folder such as yourdomain.com/staging) and click Start. WP Toolkit copies your files, database and settings to a separate site. You can then try a major update, a new plugin or a redesign on the copy while visitors keep seeing your live site as usual.
WP Toolkit runs on all our Plesk servers, and Clone and Copy Data are available in every plan that includes WordPress management. On our servers, search engine indexing is turned off for clones by default. This guide shows you how to create a staging copy, keep it private, push tested changes to your live site and remove the copy when you are done. Plesk is in English, so the button names below match what you see on screen.
What is a staging site and when do you need one?
A staging site is a full copy of your website on its own address. Nothing you do on the copy affects your live site. If something breaks, you delete the copy and start again.
A staging copy is most useful for:
- Major updates, such as a new major version of WordPress, WooCommerce or your page builder.
- A new theme or redesign that you want to build in peace before it goes live.
- A new plugin when you are not sure how it will work with the rest of your site.
- A newer PHP version. You can test this on a copy on a subdomain, because a subdomain in Plesk has its own PHP version. See how to change the PHP version in Plesk. What to check on that copy is covered in how to prepare your website for a PHP upgrade.
For a small site with a handful of plugins, a fresh backup and a WP Toolkit restore point are usually enough. See how to update WordPress safely.
How to clone your WordPress site in WP Toolkit
- Open Plesk from the customer portal: go to Services > Sites, open your site and click Log in to Plesk in the Site overview block. See how to open Plesk from the customer portal for details.
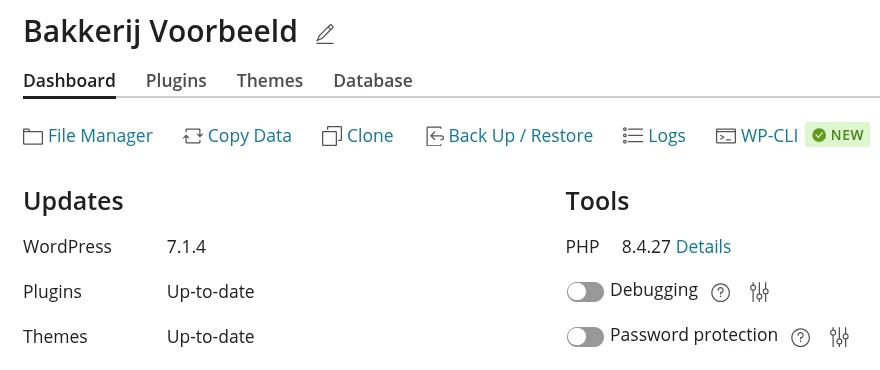
- Click WordPress in the left-hand menu. This opens WP Toolkit, with a card for each WordPress site. If your site is not listed, click Scan so WP Toolkit can find it.
- On your site's card, click Clone. A panel slides open titled Clone followed by your site name.
- Under Location, choose where the copy goes. The table below explains both options.
- Under Database, the Name field already holds a name for the copy's new database. You can leave it as it is.
- Click Start. WP Toolkit copies the files and the database and updates the addresses in the copy. When it is done, the copy appears as its own card in the list.
| Option in the Clone panel | Address of the copy | Good to know |
|---|---|---|
| Create subdomain | staging.yourdomain.com | WP Toolkit creates the subdomain for you and suggests staging as the name. The copy gets its own PHP version. If your domain uses our name servers, Plesk sets up the DNS, and the SSL certificate follows automatically, usually within an hour. The copy also shows up as a separate site in the customer portal. |
| Use existing domain with a folder | yourdomain.com/staging | WP Toolkit fills in the staging folder for you. The copy uses the same certificate and PHP version as your live site. |
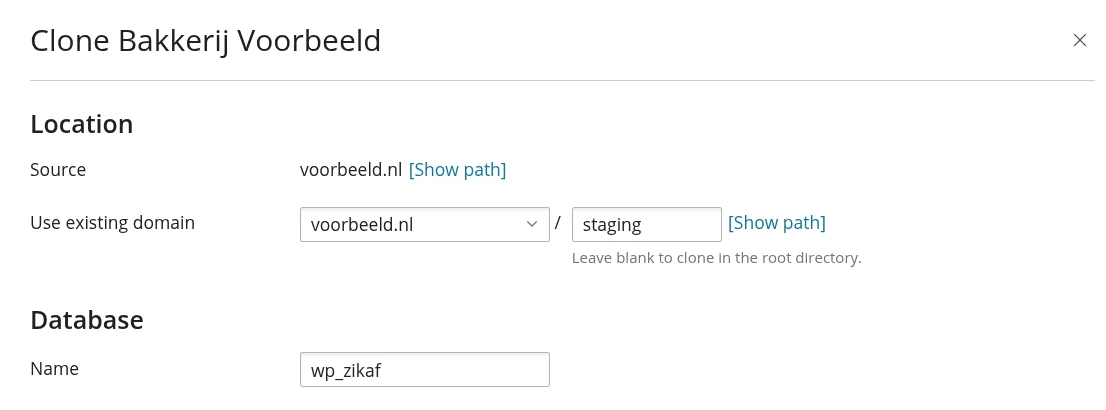
If you only see Use existing domain and no Create subdomain, your hosting plan cannot create subdomains. Choose a folder instead, as in the example above. If you would rather use a separate subdomain, see how to create a subdomain. If you pick another domain or subdomain under Use existing domain that already has a website on it, the copy overwrites that website. WP Toolkit asks you to confirm first.
Keep your staging site away from visitors and search engines
On the copy's card, the Search engine indexing switch under Performance is turned off. WordPress then asks search engines not to index the copy, so only your live site shows up in search results. This is a request, not a lock: anyone who knows the address can still open the copy. To keep it truly private, add a password:
- On the copy's card, under Tools, click the settings icon next to Password protection.
- Enter a Username and a New password, or click Generate for a strong one.
- Click Protect. Your browser now asks for this username and password before the copy opens, and that includes you.
To protect a single folder or give several people access, see how to password protect a directory or website in Plesk.
A staging copy is a complete WordPress site, so its plugins also send email and run their scheduled tasks. If you are testing a web shop, a newsletter or a booking system, make sure the copy cannot email real customers, for example with a plugin that blocks all outgoing email on the copy or redirects it to your own address.
Test your changes on the copy
You log in to the copy with the same username and password as your live site, because the users are copied too. You can also click Log in on the copy's card. Then run the update or make your change, and check your most important pages, your forms and, if you have a shop, the checkout. If you get an error or a blank page, the error log in Plesk tells you why.
Keep in mind that the copy is a snapshot. Orders, form submissions and new posts that arrive on your live site after cloning are not on the copy.
Push tested changes to your live site
Once everything works on the copy, there are two ways to make the change live.
Repeat the change on your live site
For updates, a new plugin or a few settings, this is the safest route. You now know the change works, so you repeat it on your live site, with a WP Toolkit restore point first. The steps are in how to update WordPress safely. Your live data, such as orders and form submissions, stays untouched.
Push the changes with Copy Data
If you built a redesign or made many changes at once on the copy, use Copy Data to move them to your live site.
- First make a full backup of your live site, as described in how to make a website backup.
- On the card of the copy, click Copy Data.
- Under Target, select your live site.
- Under Data to Copy, choose what to copy (see the table below).
- Under Database Tables, keep All tables with Exclude content-related tables ticked. WP Toolkit then skips the tables with your posts and pages, your users and, for WooCommerce with HPOS, your orders. To choose exactly what goes across, pick Selected tables.
- Under Restore, keep Create a restore point ticked and click Start. Your live site is in maintenance mode while the data is copied.
| Option | What is copied | When to use it |
|---|---|---|
| Files only | WordPress files, themes and plugins | You changed a theme or plugins and the settings in the database should stay as they are on the live site. |
| Database only | The database tables you choose | You only changed settings or content on the copy. |
| Files and Database | Both | You are launching a redesign together with its settings. |
Keep these points in mind:
- Files and tables that exist on both sites but differ are overwritten on your live site. Anything that only exists on the live site stays, unless you tick Remove missing files.
- Even with Exclude content-related tables ticked, the other tables are copied, including the WordPress settings and the tables where plugins store their data, such as form submissions. Anything that changed in those tables on your live site since you cloned it is overwritten. If you run a shop or use forms, Files only or Selected tables is usually the better choice.
- If your live site runs a newer WordPress version than the copy, WP Toolkit stops. Update the copy first. If the live version is older, WP Toolkit updates it first and then copies the data.
- After copying, check your live site and make sure Search engine indexing is still on for the live site's card. Turn it back on if needed, so your site stays visible in search results.
If something goes wrong, use the restore point to roll back your live site. A restore point only stores part of your site and each site has only one, so your backup remains your safety net.
Remove the staging copy when you are done
- On the copy's card, open the menu with the three dots and choose Remove.
- In the Deleting WordPress Website window, make sure the options to delete the copy's database and database user are ticked, then click Yes. Double-check that you are using the copy's card and not the card of your live site.
- If the copy was on a subdomain, also remove the subdomain under Websites & Domains with Remove Subdomain. If it was in a folder, use the Plesk File Manager to check that the folder is empty.
A staging copy counts towards the storage of your hosting plan, because your site's files and database are stored a second time. Removing it keeps your plan tidy. You can see how much space you use in the customer portal; see how to check your storage usage.
Troubleshooting cloning and Copy Data
| What you see | What to do |
|---|---|
| There is no WordPress item in the Plesk menu | WordPress management is not enabled in your plan. Contact support. |
| The Clone panel has no Create subdomain option | Your plan cannot create subdomains. Clone to a folder, or see how to create a subdomain. |
| Your browser warns about an insecure connection on staging.yourdomain.com | The certificate for a new subdomain is issued as soon as the subdomain points to our server, usually within an hour. If your domain uses other name servers, add the DNS record first as described in how to create a subdomain. |
| Copy Data says the target has a newer WordPress version | Update WordPress on the copy to the same version as your live site and start Copy Data again. |
| Orders or form submissions are missing after Copy Data | Restore the restore point or your backup, then copy again with Files only or Selected tables. |
Still stuck? Create a support ticket and we will help you out.
Frequently asked questions
Will Google index my staging site?
On our servers, WP Toolkit turns off Search engine indexing for clones by default. WordPress then asks search engines not to index the copy. Anyone who knows the address can still open it, so turn on Password protection on the copy's card if you want to keep it to yourself.
Does a staging site count towards my hosting storage?
Yes. The files and database of the copy count towards the storage of your hosting plan, whether it is on a subdomain or in a folder. The storage of your hosting plan is a soft limit. If you go over it, your website and email keep working and we send you an email showing how your usage is split across website, email and databases. You then have 7 days to free up space or choose a larger plan. After that we charge 3 euros per started GB per month above the limit, excluding VAT, until you are back under the limit. So remove the copy once you no longer need it.
Why is there no Create subdomain option in the Clone panel?
Your hosting plan cannot create subdomains. Choose a folder under Use existing domain, for example staging, and the copy goes to yourdomain.com/staging. If you prefer a subdomain, see our guide on creating a subdomain.
Does a staging copy on a subdomain get an SSL certificate?
Yes. As soon as the subdomain points to our server, we request a free Let's Encrypt certificate automatically, usually within an hour. A copy in a folder uses the certificate of your live site.
Will I lose orders if I use Copy Data?
With the default Exclude content-related tables option, your posts, pages, users and, for WooCommerce with HPOS, your orders stay on the live site. Other tables, such as settings and form submissions, are overwritten. Always make a backup first, and for a shop prefer Files only or Selected tables, or repeat the change on your live site.
How do I log in to my staging site?
With the same username and password as your live site, because the users are copied too. You can also click Log in on the copy's card in WP Toolkit.