How to use the Plesk File Manager: upload, create, extract and set permissions
Published on November 9, 2026 9 min read
Use the Plesk File Manager to upload files, add ads.txt, extract a ZIP and set 644 or 755 permissions, right in your browser. A step-by-step guide.

The Plesk File Manager lets you manage your website files in your browser, without an FTP client. Open your domain in Plesk and click Files: you land in the httpdocs folder, where you upload files, create a file such as ads.txt, extract a ZIP archive and set file permissions.
This guide walks you through each task, explains which folder your files belong in and shows how to restore a deleted file. Prefer an FTP client? See how to upload files with FTP, FTPS and SFTP.
How to open the File Manager in Plesk
The file manager is called Files in the menu and File Manager at the top of the page.
- Open Plesk from the customer portal: go to Services > Sites, open your site and click Log in to Plesk in the Site overview block. You are signed in right away. See how to open Plesk from the customer portal for details.
- Go to Websites & Domains and open the Dashboard tab in the card of your domain.
- Under Files & Databases, click Files. The File Manager opens straight in the
httpdocsfolder.
If you click Files in the left-hand menu instead, you start in your Home directory. Click httpdocs there to reach your website files. New to Plesk? The Plesk control panel guide shows where everything is.
Which folder do your files go in?
Your website lives in the httpdocs folder. This is the document root of your site: a file stored there opens at https://yourdomain.com/filename.
| Folder | What it holds |
|---|---|
httpdocs | Your website. Everything here is reachable through your domain, including files in subfolders: httpdocs/folder/photo.jpg opens at https://yourdomain.com/folder/photo.jpg. |
| Home directory | The folder above httpdocs. Files stored directly here cannot be opened through your website. |
logs | The log files of your website. See how to view error logs in Plesk. |
.trash | The File Manager recycle bin (see below). It appears the first time you delete something. |
A subdomain or additional domain with its own website has its own folder. You find it at the bottom of that domain's card in Websites & Domains, next to Website at.
How to upload a file
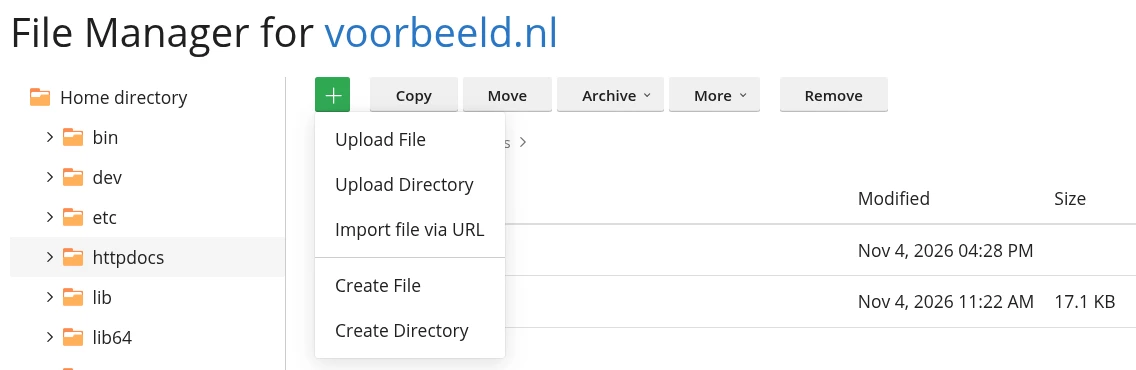
- Open the folder the file should go in, usually
httpdocs. - Click the green plus button and choose Upload File.
- Select the file on your computer. Once uploaded, it shows in the list.
To upload several files or a whole folder at once, choose Upload Directory and drag your files or folders onto the box with the dashed line. Import file via URL fetches a file straight from another website or FTP server, so you skip the download to your own computer.
Moving a complete website? Uploading one ZIP file and extracting it is the fastest route (see below). Coming from another host? Also read how to migrate your website to LJPc.
How to create ads.txt or a verification file
Google AdSense asks for an ads.txt file in the root folder of your website, and services such as Google Search Console may ask you to place a verification file. That root folder is httpdocs. Here is how to create the file in the File Manager:
- Open the
httpdocsfolder. - Click the green plus button and choose Create File.
- Enter the name under File name, for example
ads.txt. Leave Use the HTML template unticked: that option fills the file with a blank HTML page. - Click OK. The empty file now shows in the list.
- Click the file name. It opens in the Code Editor.
- Paste the lines you were given, for example
google.com, pub-0000000000000000, DIRECT, f08c47fec0942fa0, and click Save.
Then open https://yourdomain.com/ads.txt in your browser. If you see your lines, the file is in place and Google can read it.
- Ready-made verification file, such as an .html file from Google Search Console: upload it to
httpdocswith Upload File and keep the file name exactly as it is. - File inside a folder, such as
.well-known: first create the folder inhttpdocswith the plus button and Create Directory, open it, then create or upload the file there. - WordPress with a plugin that manages ads.txt: a real file in
httpdocstakes priority. The web server then serves that file instead of the lines from the plugin, so pick one of the two.
How to edit a file
Click the name of a text file, such as a .txt, .php, .html or .htaccess file, and it opens in the Code Editor. The menu with three lines at the end of each row also offers Edit in Text Editor, and for .html files Edit in HTML Editor. Save saves and takes you back to the list; Save and resume saves and keeps the editor open.
- Before you change an important file such as
.htaccessorwp-config.php, choose Download in the row menu first. That gives you a copy on your computer to fall back on. For a full backup of your site, see how to back up your website. - The File Manager shows files that start with a dot, such as
.htaccess, by default. If you do not see them, go to More > View Options and tick Show system files and directories. What to put in an .htaccess file is covered in how to set up .htaccess.
How to upload and extract a ZIP file
- Create a ZIP file of your files on your computer.
- In the File Manager, open the folder where the contents should go, usually
httpdocs, and upload the ZIP file with Upload File. - Open the menu with three lines in the row of the ZIP file and choose Extract Files. You can also tick the ZIP file and choose Archive > Extract Files in the toolbar.
- Plesk extracts into the folder that holds the ZIP file. To overwrite files with the same name, tick Replace existing files.
- Click OK.
- Delete the ZIP file afterwards. As long as it sits in
httpdocs, anyone can download it through your domain.
The File Manager extracts ZIP, RAR, TAR, TGZ and TAR.GZ archives. If everything in your ZIP file sits inside one folder, your site ends up in a subfolder such as yourdomain.com/website. In that case, tick the files in that subfolder and use Move to put them in httpdocs, or create the ZIP file again with the files at the top level.
It works the other way round too: tick files or folders and choose Archive > Add to Archive. Plesk creates a ZIP file in the same folder, which you save to your computer with Download in the row menu. Remove it from httpdocs afterwards.
How to change file permissions in Plesk
Permissions decide who can read, change or run a file. The Permissions column shows them as, for example, rw- r-- r--. Click that value, or choose Change Permissions in the row menu. Plesk uses tick boxes for Owner (your website), Group and Others instead of numbers such as 644.
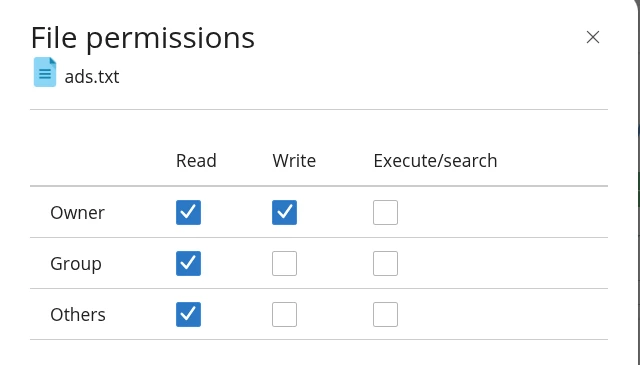
| chmod value | What to tick | Use it for |
|---|---|---|
| 644 | Owner: Read and Write. Group and Others: Read. | Files |
| 755 | Owner: Read, Write and Execute/search. Group and Others: Read and Execute/search. | Folders inside httpdocs |
Then click Save. A change applies only to the file or folder you selected, not to the contents of a folder.
- Files you create in the File Manager already get 644. You mostly need to change permissions after a 403 Forbidden error, or when an application or our support team asks you to.
- Leave the permissions of the
httpdocsfolder itself as they are (rwx r-x ---): that is how it is meant to be set up on our servers. - Never tick every box (777). That lets anyone change the file and is a serious security risk.
How to delete or restore a file
Tick the file or folder and click Remove. Plesk asks to move it to the Recycle Bin: it then goes to the .trash folder in your Home directory. If you tick Skip the Recycle Bin and permanently remove, it is deleted for good straight away.
- Click Files in the left-hand menu and open the
.trashfolder. - Tick the file you want back and click Move.
- Choose the folder it came from, for example
httpdocs, and confirm.
How long files stay in the recycle bin is shown under Rotation Settings in the .trash folder. The default is 30 days. Empty Recycle Bin clears it in one go. If a file is no longer in the recycle bin, restore it from a backup; see how to back up your website.
File Manager or FTP: which should you use?
| What do you want to do? | Best choice |
|---|---|
| Add or change a single file, such as ads.txt, a verification file or .htaccess | File Manager |
| Move a complete website | Upload and extract a ZIP file in the File Manager, or use FTP |
| Update many files often, or work with large files | FTP with a client such as FileZilla |
| Give a web developer access to the files only | A separate FTP account for that person |
How to set up FTP and create an FTP account for a developer is explained in how to upload files with FTP, FTPS and SFTP.
Troubleshooting
| Problem | Solution |
|---|---|
| Your file returns 404 Not Found on your website | Check that it is in httpdocs, not in the Home directory or a subfolder. Mind upper and lower case too: Ads.txt and ads.txt are two different files on the server. |
After extracting, your site shows at yourdomain.com/folder | Your ZIP file contained a folder. Use Move to put the files in httpdocs. |
| 403 Forbidden after uploading | Set files to 644 and folders to 755, as described above. For other causes, see how to fix a 403 Forbidden error. |
You cannot see .htaccess | Tick Show system files and directories under More > View Options. |
| Uploading or creating a file shows an error | Try the other route: if uploading fails, create the file with Create File and paste the contents, or put it on the server with FTP. If the error keeps coming back, send our support team a screenshot of it. |
Need a hand? Call us on +31 85 130 6429, email support@ljpc.nl or create a support ticket. We are happy to help.
Frequently asked questions
Where do I put ads.txt on LJPc hosting?
In the httpdocs folder of your domain, which is the root folder of your website. In Plesk, go to Files, click the green plus button, choose Create File, paste your lines and click Save. The file then shows at https://yourdomain.com/ads.txt.
Can I upload a whole folder in Plesk?
Yes. Choose Upload Directory under the green plus button and drag the folder onto the box with the dashed line. For a complete website, uploading one ZIP file and using Extract Files is usually faster.
Which archive formats can the Plesk File Manager extract?
ZIP, RAR, TAR, TGZ and TAR.GZ. Plesk extracts into the folder that holds the archive. Delete the archive afterwards, because anyone can download it from httpdocs.
How do I restore a deleted file in Plesk?
In Files, open your Home directory and then the .trash folder, tick the file and use Move to put it back in its original folder. By default files stay in the recycle bin for 30 days. After that, restore it from a backup.
How do I set 644 or 755 permissions in Plesk?
Click the permissions of the file or folder in the Permissions column. For 644, tick Read and Write for Owner and only Read for Group and Others. For 755, also tick Execute/search for all three. Then click Save.
Why can I not see my .htaccess file in Plesk?
The File Manager shows files that start with a dot by default. If you do not see them, go to More, View Options and tick Show system files and directories.